|
Are you getting enthusiastic? Do you want to get
started with polymer clay?
The easiest way is to buy about 5 colours (including
white), a set for beginners.
Fimo and Creall-therm
are available from packages of about 2 ounces.
Furthermore, you will need the
following:
 aluminium foil
peeling-knife
brayer
pricker or match
smooth surface to work on
smooth tile
ordinary kitchen over (no microwave)
Most creativity shops sell basic sets. These contain
modeling material in several colours, modeling slice
and varnish.
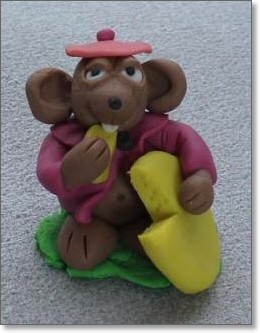
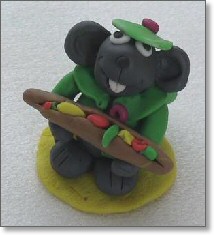
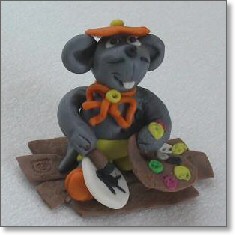
To create a mouse as seen in the picture above please
follow instructions:
Put your workpiece on the tile, covered in aluminium
foil, otherwise it will stick onto the surface of the
tile. Knead the modeling material until it is smooth
and pliable.
Roll out on smooth surface. If it's
green it can be grass, yellow beach, what ever you want.
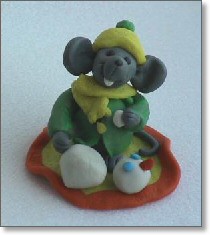
Mouse
with snowman
Do you want to create a gray mouse mix a very little
bit of black with your white.
Parts
Use
for the body a ball of clay and for the head a smaller
one. Use for the coat another colour, the sleeves too.
Use for the sleeves a roll of clay, cut in two.
After
this you will need 7 smaller balls of clay in the colour
of the body for the ears, tail, feet and the hands.
He will need a hat, decorate it as you like.
Head
Put a
ball between your thumb and your index finger and make
it a bit pointed. With your modeling slicer or the
peeling-knife you can make a mouth. Put a very small
ball of black clay on the tip (the nose). Use very small
balls of clay or two pin-heads for the eyes. The ears
are made of two small balls of body colour, put the
flat end of your modeling slice on one end, see picture.
The incisors are made of a little bit of white clay.
Put it inside the mouth and attach it well.
Student
Coat
Make
a thin rectangular slice for the coat. Put it carefully
around the body, fasten it on him. It must be a little
bit wider that the body, fold/crease it around him.
Put the sleeves on to the coat, at the top and check
if the arms are not too long. The collar is made of
a small rectangular piece of clay. Put is around his
coat and sleeves. He has one button, choose a bright
colour. Now you can give him a tail. Roll the clay until
the right size emerges and attach it to his body, under
his coat.
Feet
From
two balls of clay (the same colour as the body) you
form the feet. Make them a little bit oval. One side
has to be flattened. On this you put the body of the
mouse. Carve lines in his feet --> toes.
Finishing the head
You
can fasten the head on the collar, be careful not to
flatten the form of the head. Put on his ears.
Le
maitre
Hands
Use
the remaining two small balls. One end of these hands
must be put in his sleeves. Make a hole in the sleeve
and put in the hand. Carve the fingers into it.
Hat
The cheese
thief is wearing a beret and the snowmouse a cap. Use
your imagination and try to have him look funny.
Finishing touch
Create
a scenery i.e. flowers, cheese, snow.
Finished models are hardened in the oven at 110
C. Hardening time: about 30 minutes.
When you have finished your mouse, please
let me know.
For more pictures of mice, click
here.
Have fun!
|